A sinus lift procedure is done to create extra bone height in the upper back jaw before placing a dental implant. In Tewksbury, MA, many patients feel uneasy about the idea simply because they are not sure what actually happens during surgery. When you understand each step in plain language, the procedure tends to feel far more manageable and far less mysterious.
At ReNEW Dental, Dr. Elaine Wu, DMD believes that knowing what to expect makes a real difference in how patients feel walking into surgery. She takes time to explain why the sinus lift is needed, what will happen during the appointment, and how each step supports long term implant stability. With detailed digital imaging and careful planning, her focus stays on predictability, comfort, and steady healing rather than rushing through the process.
Careful Planning And Digital Imaging Before Surgery
Every sinus lift starts long before the surgical day actually arrives. Detailed digital scans are taken to evaluate how much bone height is present and exactly where the sinus membrane sits. These images help determine how much additional bone is needed and where it should be placed.
When Dr. Wu reviews your imaging, she is not just looking at one small spot in isolation. She evaluates how your jawbone, sinus cavity, and overall oral health work together as a system. This planning stage reduces surprises and allows the surgical appointment to feel controlled rather than reactive.
This preparation phase also gives you the opportunity to ask questions and understand the plan in plain language. Seeing your own imaging makes it easier to visualize why the procedure is necessary and how it will help. By the time surgery day arrives, you are not walking in blind, you are walking in informed and prepared.
Accessing The Surgical Area With Precision
On the day of the procedure, the area is completely numbed so you remain comfortable throughout the appointment. A small incision is made in the gum tissue to gently expose the underlying bone. The opening is positioned carefully so that access to the sinus area is precise and limited to what is necessary.
This part of the procedure is focused on visibility and control. A small window is created in the bone to allow access beneath the sinus cavity. The technique is deliberate and measured, which helps protect surrounding structures.
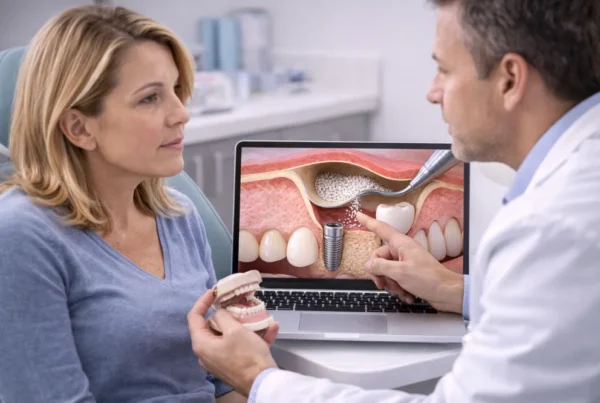
Gently Elevating The Sinus Membrane
The sinus membrane is a thin lining that rests just above the upper back teeth. During a sinus lift, this membrane is gently elevated upward to create space for the bone graft material. That space is what ultimately allows additional bone height to develop.
This step is performed slowly and carefully because protecting the membrane matters for smooth healing. Specialized instruments are used to lift it without tearing or stretching it unnecessarily. When handled properly, the membrane responds predictably and supports successful integration.
Although this part of the procedure sounds delicate, it is a well established and controlled technique in implant dentistry. The movement is measured in millimeters, not dramatic shifts, and precision is prioritized over speed. When the membrane is elevated properly, it creates a protected space where new bone can form safely and steadily.
Placing The Bone Graft To Build Height
Once the space is created, bone graft material is placed beneath the elevated membrane. The graft acts as a scaffold that encourages your body to generate new bone over time. The amount of graft used depends on how much vertical height is required for the implant.
Common graft materials include:
- Autograft, which uses a small amount of your own bone.
- Allograft, which uses processed donor bone material.
- Xenograft, which uses purified bone from another species.
- Synthetic graft materials designed to support bone regeneration.
- A combination of materials to encourage optimal healing.
Each material is selected based on safety, predictability, and long term stability. Once placed, the graft is gently positioned so it remains stable during healing. Over the next several months, your body gradually integrates the material and replaces it with living bone tissue.
Closing The Area And Supporting Early Healing
After the graft is placed, the gum tissue is repositioned and secured with sutures. The surgical site is carefully closed to protect the area while healing begins. Proper closure helps keep the graft stable and shielded from unnecessary disturbance.
Before you leave, post operative instructions are reviewed in detail so you know exactly what to expect. Because the sinus cavity is involved, minimizing pressure changes during early healing is important. Clear aftercare guidance helps reduce anxiety and supports predictable recovery.
Helpful recovery precautions include:
- Avoid blowing your nose during early healing.
- Sneeze with your mouth open to reduce sinus pressure.
- Take medications exactly as prescribed.
- Avoid heavy lifting or straining for several days.
- Attend scheduled follow up visits to monitor healing.
Most patients experience mild swelling and manageable discomfort for a few days after surgery. Each day typically feels a little better than the one before. Staying in communication with your dental team helps ensure that healing stays on track.
Timeline After Surgery
Healing after a sinus lift requires patience, but it follows a clear progression. The graft material gradually integrates with your natural bone over several months. This waiting period allows the area to become strong enough to support a dental implant securely.
| Phase | What Happens | Approximate Timing |
| Immediate recovery | Swelling and mild discomfort | First few days |
| Early healing | Tissue stabilizes and sutures dissolve | First few weeks |
| Bone integration | Graft converts into stable bone | Several months |
| Implant placement | Implant is surgically placed | After confirmed healing |
The exact timeline varies depending on how your body heals and how much graft material was placed. Follow up imaging confirms when the bone is ready for implant placement. Moving forward at the right time protects the long term success of the implant.
What This Procedure Means For Your Implant
A sinus lift can feel like an extra step, but it is really preparation for success. Without sufficient bone height, an implant may not anchor securely or function comfortably. The graft creates the structural support that allows the implant to feel stable and natural.
At ReNEW Dental, Dr. Elaine Wu, DMD walks patients through each phase of the sinus lift process so nothing feels rushed or unclear. She explains what the imaging shows, what will happen during surgery, and how healing progresses over time. If you have been told you need a sinus lift before implants, call 978-451-1500 to schedule a consultation and gain a clear understanding of your next step.
Frequently Asked Questions
How long does the sinus lift surgery appointment take?
A sinus lift procedure typically takes about one to two hours depending on the complexity of the case. That time includes preparation, graft placement, and careful closure of the surgical site. Detailed planning beforehand helps the appointment feel efficient and controlled rather than rushed.
Will I be awake during the sinus lift?
Most sinus lift procedures are performed with local anesthesia so the area is completely numb during surgery. Some patients choose additional sedation to feel more relaxed depending on their comfort level. Your dentist will review all available options in advance so you can decide what feels right.
When can I return to normal activities?
Many patients return to light daily activities within a day or two after surgery. Strenuous exercise, heavy lifting, and activities that increase sinus pressure are usually avoided for several days. Following post operative instructions helps protect the graft during early healing.
Is it possible to place the implant at the same time as the sinus lift?
In some cases, an implant can be placed during the same appointment if enough existing bone provides initial stability. In other cases, the graft must fully heal before the implant is placed. Digital imaging and careful evaluation determine which approach is safest and most predictable for you.